|
|
|
|
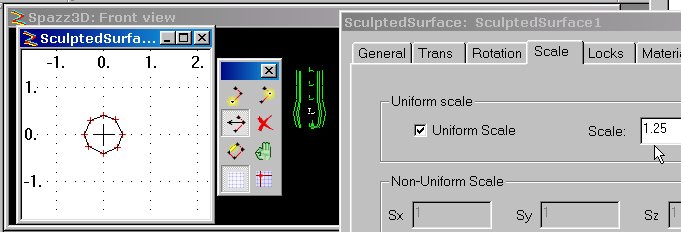
Someone wrote: > The whole edit spine thing made absolutely no sense and didn't work on the Eeek! Sorry for the lack of clarity, here is a second attempt to describe the process... Turn your head sideways and look at this... |---|--------|---|------| The line would be the spine or backbone of a sculpted surface. The "bars" would be the ribs or plates called cross sections. I sometimes describe them as a straightened coat hanger going through a number of pie plates. If you took a 3D object such as a vase and cut it parallel with the horizon into 1/3s then you would have 5 cross sections through the vase. There would be a bottom, a top, and the three places where you sliced it. The base is a circle, above it at the first cut, the vase is still a circle, but larger. Towards the middle of the vase, the circle would be the largest. The neck section is typically a smaller circle, and the top probably larger as it flares out from the neck. Does that make sense? I hope so. How might I make this vase in Flux Studio? I could make several circular cross sections of various diameters, but that is a lot of work dragging points around. So... I make one sort of circular cross section. Flux Studio "knows" you need two at least, so it adds the second cross section for you. By default, it does this one meter away from the first one. If I wanted a vase that was 1/2 meter tall, I would use the arrow keys on the Sweep Tab of the Sculpted Surface properties panel. You need to check Edit Spine to do this. Hitting the black arrow keys on that tab will change the "focus" from one cross section to the next (you will see the active one highlighted as you click the arrow). With the top one active, I click the translate tab (or icon on upper left of Flux Studio tool bar) then click in the scene and drag the cross section down. It is helpful to turn on the grid and grid snap if you want to move it a known distance. You can change the grid options if you need a finer grid to work with smaller items. If I go back to the sweep tab, I see that I can add cross sections before or after the active one, so since the top one is active, I select Insert Vertebra before to add a new layer on the spine. Since I want 5 layers, I do this two more times. I can drag each to where I want it to be (up or down). Next, I use the arrow keys to get to (make active) the second cross section from the bottom. Since I want it to be a larger circle than the bottom, I select the scale tab on the Sculpted Surface properties panel and using Uniform Scale (default), I input a value of 1.25.
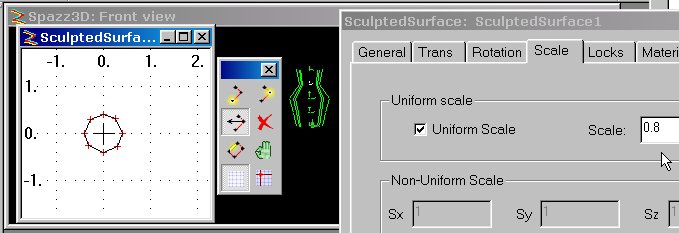
I use the arrow keys to go up to the next cross section; middle of the vase. Since this is the part of the vase with the greatest circumference, I select the scale tab and input 1.5. This cross section is one and a half times larger than the original one (the base of the vase). I go up to the next layer, the neck and scale it to be 0.8; two tenths of a meter smaller than the base.
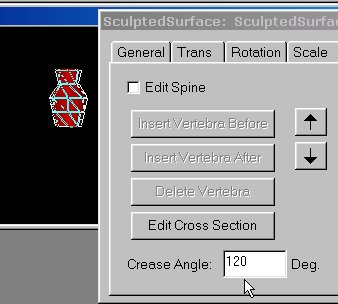
Lastly, you will see that the vase is not very smooth, you can still see angular faces, after all we have only used 8 points per cross section. VRML has a feature called creaseAngle used to make these things smoother looking. In Flux Studio the default is 30 degrees. If you bump it up to 90 or 120, the vase will look more smoothly circular and still use the same number of points.
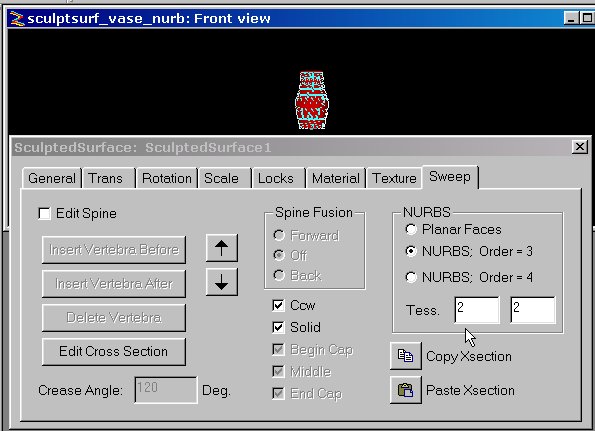
Wow, that does not look very smooth or circular! OK, one more very last step. To the right, see the NURBS option, select the 3rd order NURBS option, and change the tessellation to 2x2 (4x4 makes more points than you actually need). Notice in the example below how many more points show up on the surface, these points are calculated by the browser. When you use NURBS, Flux Studio can not generate the "end caps", so I had to add one more cross section to below the bottom and then scale it to .001 and drag it up to the same level as the bottom in order to close the base of the vase.
Here is an example of the vase that was built by this spine and ribs method. Planar Surfaces NURBS surfaces Here is the Flux Studio file for you to examine. This seems like a lot of work for a vase, and truthfully, Flux Studio has a better option for things like this, but this example is a good introduction to the spine and ribs concept for sculpted surfaces. I have several more examples of sculpted surfaces in the Intermediate Flux Studio help section. |
|
|