Trebuchet Trials
...or how to build a small scale siege engine at home in your spare time...
But first, the rules of engagement....This is a high school physics class assignment with a simple set of guidelines.
Guidelines of Catapult Contest
- The base can not exceed one meter in length and five decimeters in width.
- The throwing arm can not exceed 1.5 meters in length.
- Wood, metal, and/or plastic can be as construction material.
- No electrical devices (AC or DC) are allowed.
- The catapult must have a locking device. You are not allowed to hold the throwing arm in the cocked position.
Contests
Distance contest: Each student will get three launches. Each student will be ranked based on their longest launch.
Accuracy contest: There will be three targets placed at three different distances. Each student will be required to hit each target with a beanbag launched by their catapult. Their catapult can not be moved more than 3 decimeters in any direction. Each student will be ranked based on the number of launches that is takes to hit all three targets.
GRADE
Construction of a catapult that meets the above guidelines: 55 points
Distance Contest:
- 1st place = 30 pts
- 2nd place = 26 pts
- 3rd place = 22 pts
- 4th place = 15 pts
- minimum distance 6 meters = 10 pts
Accuracy Contest:
- 1st place = 30 pts
- 2nd place = 26 pts
- 3rd place = 22 pts
- 4th place = 18 pts
- 5th place = 14 pts
- Hit all three targets using less than 50 shots = 10 points
The process
Like any project, first do your research. But you know that or you wouldn't be looking at this page, so let's get on with it. The Grey Company Trebuchet site was very helpful and truly an inspiration. There are many other interesting terbuchet sites on the Internet.
- Make a plan. Keep it simple; something buildable and within the guidelines. A low braced triangular design was choosen for this project. 1.03 meters tall. It is important to have a plan. You may not follow it exactly and you will find out that you have left out some important detail from the plan . That may become quite obvious when you start building.
- Estimate and obtain adequate amount of materials. The design called for four eight foot long two-by-twos, so purchase five. All 5 were used, with about two feet left over.
Amazingly if you cut two one meter long parts off an 8 foot 2x2, the left over stick fits between them so the outer edge of rectangle for the base is 1 meter by 1/2 meter.
One foot of welded chain ($.046), a box of course threaded dry wall screws ($4.11), and two metal "T" plates for tieing the upright to the base, plus the wood was purchased.
Total price $14.76. Cost of annihilating a small fortress? Priceless.
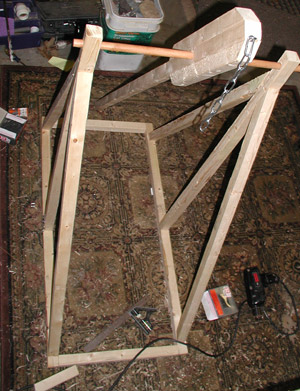
- Measure, cut, assemble. If it starts out square, it is more likely to stay square, so pay attention. We made a rectangular base, installed the up-rights, built and installed the throwing arm, attached support braces, shot trough, ballast bucket, and lastly the trigger and the sling. We clamped both up-right sticks together and drilled one hole through them both for the pivot arm. This way we knew they were aligned and square. We used carpenter's wood glue on the joints before drilling and screwing the sticks together.
- Test once... found out how too few ballast rock effects it. Sling would not let go of the ball which hit the dirt right at our feet. Add more rocks. Found out too many rocks damage the bucket handle. We also broke the wooden dowel we first were using for the pivot, replaced it with metal conduit. Ballast adjustment again, and we started getting decent tosses (20 Meters).
- Tweak and tweak some more. Made the shot trough thinner with add-in rails. Shot should travel more predictably straighter. Graphite on the pivot joints. Make double handled kitty litter buckets to deal better with the stresses. Trim and even out all ropes on the sling, improve the shot pocket. Mark the "trigger chain"; red marks every decimeter for adjustability during the accuracy contest.
- Test the effects of offsetting the trigger different distances down the chain. Hooking the trigger closest to the base (1 decimeter) produced the farthest throw 30 meters. Hooking the trigger one meter up the chain tossed the croquet ball a mere 6 meters.
- Wait for the big day, take it to school, and rock their world!
Photographic evidence
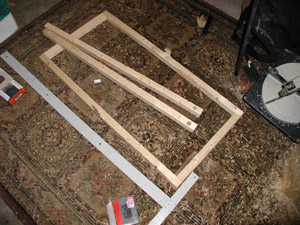
Build a base and side supports, have fun calculating those angles. Note the wooden dowel above and its replacement metal conduit below.
The chain is anchored by a screw into both 2x2's and a washer. We routed out a small channel to accommodate the chain and washer before screwing the three 2x2's together.
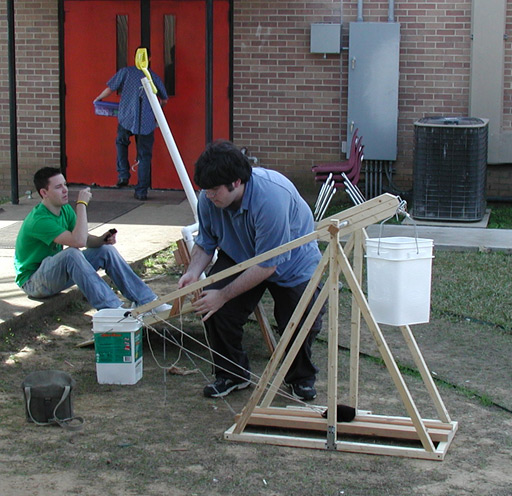
Our humble hurler, sky cam view. Note the wooden end-caps on the metal conduit, they add to the lateral stability.
Note in the background the custom "double handled" kitty litter bucket. The handle of the attached bucket is bending, so it was replaced with the bucket I added an extra handle onto.
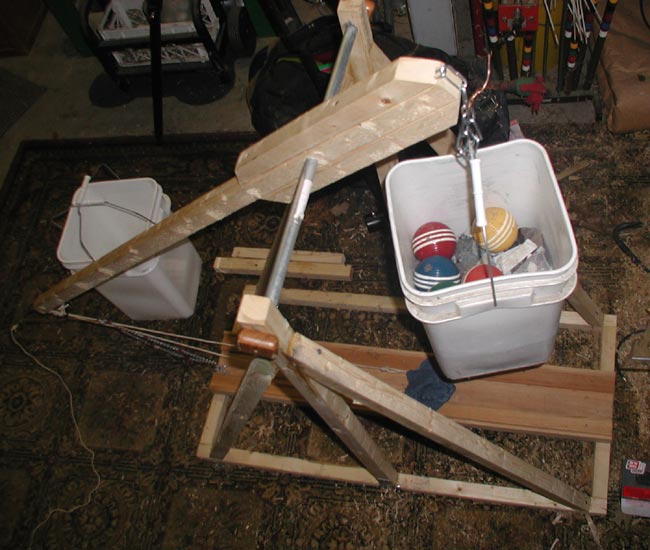
There is a "set screw" through the 2x2 and into a hole drilled in the metal conduit so the arm must move when the pivot rod moves.
Also note the croquet balls this was designed to toss :-)

As they did in medieval times, we used a carefully bent coat hanger for the trigger.
The bend in the base of the hook (where it goes into the trigger adjustment chain) is important. That slight offset allows the trigger to catch and stay on the release eye bolt. When the string is pulled, the trigger rotates around the hook and disengages from the eye bolt.
This is a safe, reliable, and easy to fire trigger. It uses a fulcrum and an offset "center of tension" for mechanical advantage. The small trigger string can be pulled from a safe distance away from the trebuchet.
The chain where the trigger is attached in has been marked in 10 centimeter increments. The trigger location on the chain is adjustable so we can win the accuracy contest.
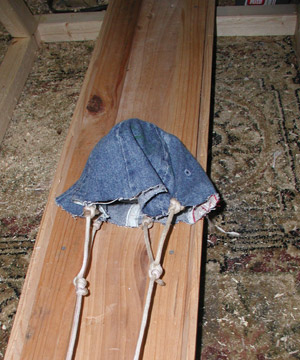
I cut the top out of a "Gimme" cap for the shot pocket, this still didn't work to good, so I split the line to have two attachment points for each string. With this setup a square piece of cloth or leather would work just as nicely (later when we found out that the "cup" would not let go of a bean bag, we did change to a square of leather). The shot trough keeps things from getting tangled up and assures a straighter throw.
Calibration Data
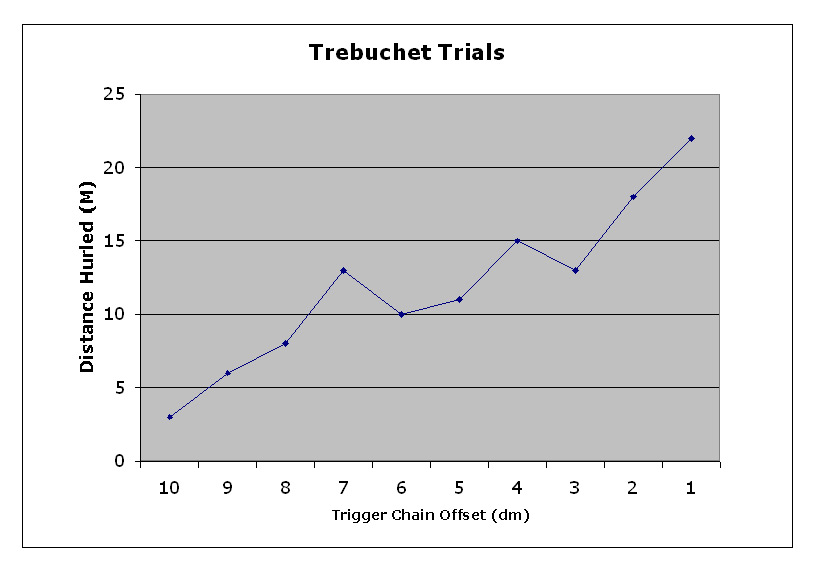 Results of our calibration test. The closer the arm is to the base (short chain), the farther the object is thrown.
What we learned...
- The design has poor lateral stability because internal cross bracing is prevented by the falling bucket/raising arm. Let's hope the Huns don't try to push it over from the side, because they can. The end caps on the pivot rod provide some lateral support, the at least keep the rod from coming out. If the rules allowed for it to be wider I would have added triangular side support braces.
- The one half of a soft cup shaped cloth garment that mother provided worked great for a shot pocket, however my senior high school aged son refused to actually touch it, so something else had to be found. I cut apart an old "gimme" hat for the concave shape, but found that a flat square would do just fine after I changed the sling attachment from one line to two per side (like a Y). With just two strings to one cloth or leather patch, it is like balancing a ball on a knife blade... difficult. If you bifurcate (split like a "Y") the line to have two attachment points on each side, it makes a natural pocket in the middle. We found that the "cap pocket" would not let the bean bags go, so later switched to a square leather flap; it released better.
- More rocks for ballast make for further throws, but you could also destroy the machine quicker. You need to find a sustainable balance. Same for the sling ropes, they can't be too long or too short but must be "just right" for it to work.
- Make sure the ropes lengths are even and knots are secure. Line length is critical, when the arm is vertical, the shot pocket should be just above the cross bar.
- The wooden towel rack dowel we first used for the pivot was too weak to handle the load of a half a bucket of swing rocks. We substituted a length of metal conduit. It was less esthetically pleasing, but had greater strength.
- The metal rod or release hook on the end of the arm got bent when the arm hit the ground. This forward bend caused the trebuchet to release too late and send everything pounding into the earth right at our feet. Bending the rod back to perpendicular fixed the release issue.
- Having the release string and the "static" string affixed to the same location (throwing rod )is critical for accurate repeatable throws. Some knots came untied and we were throwing off the eye-hook and not the throwing rod, this caused the string to pick one side of the 2x2 or the other; it killed the accuracy or repeatability of the throws.
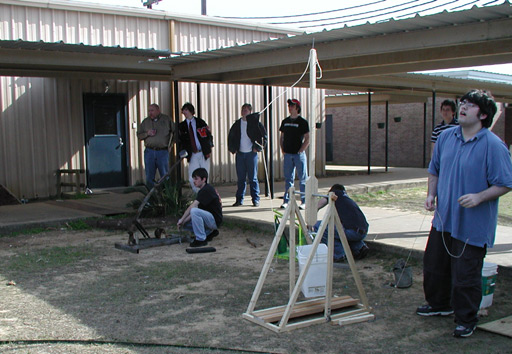
Another reason the accuracy was "less than desired" was that the target was too close for our design. Our optimum range was much greater than the others. See below, we're shooting from a "half cocked" position. Sigh.
- Calculating the angles needed for the triangular braces was trickier than you'd think. My son the math wiz, got out his 32 function scientific graphing calculator, solved the triangle and gave me the angles to cut.... it didn't work.
My son who has known what a triangle is since he was three years old, looks me straight in the eye and says, "Well then, that is not a triangle". (Please see the leg braces and tell me what other geometric shape they might be).
Too much knowledge and getting too close to the numbers, believing your calculations over what your eyes tell you to be true, that is a dangerous thing. I got out a chalk line plumb-bob, found vertical, popped a blue line on the 2x2, held it on the saw and got a "Buba, get 'er done!" cut.
- This project, though larger, took us much less time than the Popsicle stick tower project and was almost as fun as the mousetrap powered racer.
Parting Shots
5,4,3,2,1... Lift off!
And away we go!
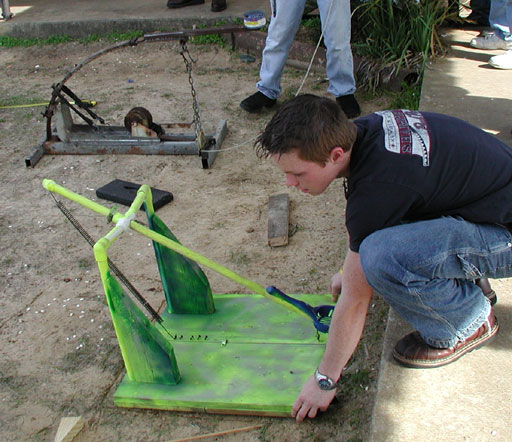
The truck leaf spring concept (top) took the distance award.